Sunday, October 11, 2026

One Year With My New Knee

Hey strangers! Yes, I still have this blog and no, I haven't updated this in YEARS! Man, it took me awhile to remember how to do this blogging stuff! With a momentous occasion, I felt this was worth of its revival. Yes, one year ago (and ten days) from October 1, 2025, I did something I had been putting off for quite a while... I had my right knee totally replaced (Total Knee Arthoplasty).

This really wasn't something that happened overnight. I originally tore my ACL and had it surgically repaired way back in 1993 as a result of multiple hyper-extensions during high school football at South St. Paul High School as well as playing tennis. Over the next 30+ years arthritis slowly took its toll on that knee. There were cortisone shots, other injections and plenty of times where I just dealt with the pain. It never really stopped me from doing the things I wanted to do - completed a (sprint) triathlon, multiple in-line skiing marathons as well as many 5k runs , but as the years went on, those things started hurting more while I was doing them... and usually even more the next day. Eventually I realized that if I wanted to stay active as I got older, it was time to do something about it.

Once the decision to do the surgery was made (yes, my orthopedic doctor was pushing me to postpone as long as I could bare), I put in the time doing the pre-operation exercises and strengthening of both the knee and surrounding muscles. Looking back, I am convinced that "pre-hab" played a HUGE part in how quickly I recovered. I apparently wanted to give the old knee one last workout too, because just a few days before surgery I was walking all over Austria and Germany with friends during Oktoberfest! Then it was back home and off to Twin Cities Orthopedics for a total knee replacement. Amazingly, I was up and walking the SAME DAY as the surgery. Two months later I was lightly golfing in December, and by January I was pretty much back to playing normally.

Fast forward one year and, while I wouldn't call the knee 100%, the difference is pretty incredible. I'm essentially free of the pain I once had and can certainly bike, golf, play pickleball and walk as much as I want without paying for it later that day or the next morning like before. I'm still hoping to eventually work some light jogging back into the mix, but overall the entire experience has been pretty mind blowing from a medical perspective. Thirty-some years after that original ACL surgery, I've basically been given another shot at doing the things I enjoy without constantly thinking about my knee!

There is one downside to having a few new pieces of hardware in me though. Airports and arena security scanners seem to find me a little more interesting these days. I guess I can finally say I'm officially carrying a little more metal with me wherever I go. 👊😝🤘


Tuesday, July 30, 2019

Lake Rebecca singletrack mountain biking footage!

Some of you may know I have been a fan of the bicycle since I was 2 1/2 years old (heck, see the picture here to prove it!), I've virtually done it all. From at first being a basic rider then graduating to BMX freestyle in elementary school (and breaking my arm off a half-pipe), to having a bike as my main mode of transportation throughout the first few years of college at Winona State and then on to mountain biking (MTB) as well as road cycling, I've almost done it all with a bicycle!

Well, after going over the handlebars a few weeks back, I said t the guy I was riding with, Pat, that I should have had that on video. Well, the next time I went out, I figured I'd strap my GoPro 5 to my helmet and take a ride! I went out on Saturday, July 27th with a different friend, John, out to Lake Rebecca along with a few others from my local bike shop, Michael's Cycles.

I didn't crash, but a few (including John) did! Sorry I don't have those on video, but you can see from the below, I was on my own for a good portion of the 2-hour ride. I only got about 40 minutes of it on video and even then, I sped it up and clipped out most of it to about 4 minutes.

See below for that video (or click here to download). Enjoy!

Tuesday, December 11, 2018

Lost footage - Homebrew Con 2017 - Timelapse video from the JAB booth!


Hey strangers! Long time, not a lot of posting happening out here, but seeing I have some vacation time here at the end of 2018, I figured I'd post some things I've had laying around.

As some of you know, I am an avid homebrewer of beer for many years. As part of this hobby, I participate in a local homebrew club called the Jack of All Brews, based out fo the west metro. As part of this club, we participated in the national event put on by the National American Homebrewers Association called Homebrew Con.

Below was some 'forgotten' footage of a GoPro cam I had stuck into the corner of our booth. This particular footage was the evening where all the homebrew clubs from across the nation joined to share and talk about their beers. You can see fellow club members standing around, serving and chatting with others throughout this ~3 hours event... heck, I even make an appearance at one point! Overall a great night mingling with fellow brewers!

Click on the below image to pull up the video (or click here to view or download a hi-resolution file version!). Cheers!


Saturday, March 10, 2018

It's ALIVE! The light and dark side of kombucha.

I figured I would make a post about this topic as I appear to have several friends and/or family members interested in kombucha via my picture posts on Facebook.

To do a quick, description in layman's terms, kombucha is a fermented beverage made from sweetened black or green tea. It is produced by a "symbiotic culture of bacteria and yeast" (aka SCOBY).

This is where most people get turned off. The SCOBY (pictured here above and to the right)

Again, to put things in simple terms, a SCOBY is gelatinous 'blob' that is made up of bacteria and yeast... and visually looks disgusting. Kind of like a jellyfish or layer of slime one would find in a swamp or something. If you are able to get past 'the dark side', and look at the 'light side' (the healthy aspects of this probiotic drink), kombucha is truly a tasty, thirst-quenching, refreshing drink! I think the main reason it has been on a-lot of people's radars lately is because of the reported health benefits of consuming it. As reported in this WebMD page, kombucha is claimed to help your digestion system, boost energy level and help the body get rid of toxins... all of this is scientifically un-proven (just so you know).

My wife got me turned onto this drink many years ago and we both went though a phase where we purchased  several bottles a week. GT's was probably the biggest brand that came into the market (at least in our area) and came in a variety of flavors. Unfortunately, just like some exotic coffee brands, purchasing this at ~$3.00 a bottle, certainly added up quick! That's when I started looking into making it myself..

Being a homebrewer of beer for many years and the result of various Google and YouTube searches  about making kombucha, I realized that it didn't appear to be hard to do. As long as you had some basic equipment, the time and patience, anyone could do it. All you need is a few things - vessel to hold 1 gallon, a piece of cloth to cover during fermentation, tea leaves, sugar and a SCOBY. To simplify the process, this is what you would do in a nutshell:

Basic Brewing Instructions to make kombucha:
  1. In a pot or kettle, bring 1/2 gallon of water to about 180° F
  2. Remove from the heat
  3. Add in ~35grams of loose leaf tea (you can use store bought tea/tea bags if you want!)
  4. Let the tea leaves steep/sit there for ~4 minutes
  5. Strain out the liquid into another container, removing all the loose leaf tea bits
  6. Clean the pot/kettle, pour the tea you just strained/made back into it
  7. Add 1 cup of sugar to the newly strained tea. Stir to dissolve completely
  8. Pour the now sweet tea into a glass gallon jar or vessel you are going to let things ferment in.
  9. Add the remaining water to bring it up to 1 gallon; approx 1/2 gallon. NOTE: I'll often add ice cubes to to ensure the temperature is down to 70-75° F
  10. Once the temp is below 80° F, add the SCOBY!
  11. Cover the vessel with some cheesecloth or other clean piece of cloth and secure it with a rubber band
  12. Store it in a warm dark place; wrap it in a towel if you'd like. Temps should be in the mid-70° F's for it to ferment
  13. In about 5-7 days, sample the liquid to your taste (should have a mild vinegar essence to it). If you want to get more precise, take a pH reading using test strips; it should be in the the 3's). You can leave it go for longer if its not ready.


Secondary fermentation: 

This is what I have always done, but you don't have to. Secondary fermentation is the time you remove the SCOBY and pour off the kombucha into bottles (or a secondary vessel) to add flavorings and let it carbonate and get fizzy.

I like to add ginger paste tagged along with some fresh/frozen/dried fruit pieces or fruit juice. This stage is all about your making something you like! You'll have to play with the amount of juice or pieces of fruit to add (depending on the size of your vessel or bottle). Personally, I use cleaned out, de-labeled, GT's bottles that I have accumulated over time along with some 38mm growler caps purchased from my local homebrew shop. I often let the fruit meld with the kombucha for a week or so; that give it time for the solution to become fruity effervescence!

Equipment and setup:

For me, I started out with the simple 1 gallon glass jar for my fermentation vessel, some store bought tea bags, some organic sugar and a scoby purchased through Amazon (see below for some links of things I have purchased). Over the years, I've added on to the setup to include a heat-wrap with temperature controller and most recently moved to a continuous brew system like this one from Midwest Supplies.


Anyway, I could go on and on about this, so I will wrap this post up with this - for those of you who are looking for resources and places to go for getting into the kombucha game, check out these links that I have either used or purchased things through. Best of luck and feel free to hit me up if you have questions!


The starter kit I bough back in 2014! - https://www.amazon.com/gp/product/B00LW7OR4A/ref=oh_aui_search_detailpage?ie=UTF8&psc=1

Scoby(s) I have purchased - https://www.amazon.com/gp/product/B009ZW8RP4/ref=oh_aui_search_detailpage?ie=UTF8&psc=1

Tea blends that I have used -https://www.amazon.com/gp/product/B008OHZ1C8/ref=oh_aui_search_detailpage?ie=UTF8&psc=1
https://www.amazon.com/gp/product/B01M0TPAVM/ref=oh_aui_search_detailpage?ie=UTF8&psc=1

Kombucha Revolution book - https://www.amazon.com/Kombucha-Revolution-Recipes-Homemade-Elixirs-ebook/dp/B00H6JHUQA/ref=sr_1_1?ie=UTF8&qid=1520716179&sr=8-1&keywords=kombucha+revolution

Other places I have purchased from -
Kombucha Kamp - I've bought some tea blends form them and most recently a brew stand for my continuous system shown in the picture above - https://www.kombuchakamp.com/


Thursday, January 4, 2018

Heavy Metal fingers

A great oldie but goodie for ya here. This one's for all my rock and metal friends! You can click on the image to the right or here to view the full size image by Jon "Bean" Hastings. Click here for the alternative version too ;)


Sunday, April 30, 2017

DIY: Bluebird House

Hey fellow wood-workers! Spring is here and if its not too late, here's something I've made a few of years back... blue bird houses! These are solid and work great! Its really nice that you can flip down the front piece at the end of the season to remove the old nest. Simply close it back up and insert the pin the following year for a renewed use!

Click here for some old-school DIY dimension cutouts!


Tuesday, April 11, 2017

GoPro footage: Timelapse of drive

So just for funsies, I created a timelapse video of a family drive from our home in sweet Carver, MN to the urban jungle of a state called Illinois. OK, it wasn't a drive to the shady area of Chi-town, but rather to the area of Rockford and its surrounding communities (even through there was a shooting in a few miles from where we were at during the time; we went out to eat across from the scenes of the crime).

This was an experiment and a little fun for me to test drive the GoPro Hero 5 action cam. Enjoy!

On the way out (check out G rockin' in the background!):


On the way back (yes we drove past a crash on our way back!):


Wednesday, March 15, 2017

Retropie HDMI audio fix

Here's a quick fix for those of you scouring the interwebs for a reason (fix) why HDMI audio isn't working on you Raspberry Pi. It looks like some settings need to be configured within the config.txt file within Retropie. Here's the original video that solved my issue, but I'll break it down real quick for ya:

1. Boot up Retropie and exit out of Emulation Station using the GUI. This will get you to the shell/command line. From here do the following:
Type sudo nano /boot/config.txt (this will open the config.txt file in an editable form)

2.Find the following line and remove the "#" to uncomment out the setting (make them live)
hdmi_drive=2
hdmi_force_hotplug=1

3. Add the following (anywhere in the file; I did mine at the top)
hdmi_force_edid_audio=1

4. Save by holding down the CTRL-X keys and type "Y" when is asks you to save and overwrite the current file

5. Reboot Retropie by typing in sudo reboot

BOOM! All should be fixed. Open a game and confirm all is well!

Monday, February 20, 2017

Bliss for music libray management

So I've become pretty "knee-deep" in an upcoming post; something that I've been working on for many years as a matter of fact. It has to do with me, my personal music collection and how I've moved from cassette tapes to compact discs over the years to now having everything digitally available on my home network. PLEASE NOTE: I still love 'owning the media', but because I am always on the go, in different places all the time, so having everything in portable format is great. You ask, "Why not just stream it?" I know that seems to be what the thing to do is today, but I guess I consider myself 'old school' and like to 'own' my music from the first track to the last!

The reason for this post (and the piece of software I am about to tell you about) is because I was trying to understand why some of my album art was not showing up on my Ford Sync 3's head unit in my (2016 Black Friday purchase) truck. Well after a quick Google search, I came across a blog post from Dan at Bliss. Basically this article mentioned without the proper ID3 tags and image size, the info/album art limits what will show in the Sync's display unit. This really prompted me to finish this cleanup/migration effort of mine that has been in progress for years.

Bliss is one of those apps that is a key player now in the management of my music collection. It used to be TuneUp, but seeing the support for that product is pretty much dead, Bliss has filled that hole. I like that the application supports the macOS platform (as thats my OS of choice) but also has flavors for other operating systems as well. After installing, it basically runs a 'server' type service on your local machine that you configure to point to a 'watched folder' so it can scan, analyze and report what may be wrong with the media. Whats also greta about it is you can customize what you want this tool to do down to some semi-granular detail.

Settings such as album art size is a key thing you can set. In my case, I wanted to make sure album art was no larger than 500x500 pixels, yet no smaller than 300x300. This way, it would render in my car deck (old school term right there, huh?). It can assist with locating or even uploading album art if you are missing it altogether. Pair that with proper ID3 tags (metadata tags) along with a standard file naming convention, it can turn a mess of a collection into a well organized one. Take a look at the before and after screenshot of all my "Lo-Fi" music files!


If you are someone like me and had a mess of a digital music library collection after burning all those compact discs and such, Bliss truly made this whole process a breeze.

Tuesday, February 14, 2017

Concert review: AC/DC (1 year later)

OK, so there has been alot that has happened in the AC/DC camp in the past year, but I decided to finally publish my review on the show they did (just weeks) before Brian Johnson left was outed by the band. I've been sitting on most of my words in draft form here on my blog since the event, not knowing when the best time to post this would be. With it being a year later, I think its an appropriate time.

To start, I've seen AC/DC once before - back on June 27 1991 as a matter-of-fact, at the ol' Met Center in St. Paul, MN. I was in high school then and attended the show with my great friend, Gary. I remember that concert pretty well. I actually still have some "Money Talks" Angus cash from that show! Fast forward ~30 years later - guess who I went and saw them again with? YES, Gary (along with a couple other great friends - Tim V. & Patrick M.)! I want to say this concert was one of the best shows I've seen in years. Maybe it was because I got to re-experience it with an old friend as well as witnessing the "shock-and-awe" on my others friends' faces as they experienced them live for the very first time. All I know is I was smiling ear to ear for a long time during this show.

Although it wasn't exactly the best day to see a concert, Valentines Day (February 14 2016), it was still very well worth it. To describe the atmosphere, the arena was packed! The blinking, red, light-up Angus devil horns souvenirs (mainly purchased by female fans) had illuminated the open arena space and lit the place up like little red stars in the night sky (kinda romantic, eh?). And by the amount of open space the Xcel Energy Center offers, it was pretty damn cool to look at.

The stage was pretty generic, a stack of vintage Marshall cabinets, 3 high by 6 wide, filled the left and right side of the center stage/drumset. The stage itself had a left, right and middle wing as well as a long center walkway that reached out to the middle of the venue. As someone that has a seen a few shows, I could see there was something 'special' at the end of that walkway awaiting the audience at some point in time of the show... (yeah, Angus guitar solo time!)

As the lights dimmed, the crowd immediately roars in response. The trifecta of huge video screens to the left center and right of the stage light up with a montage of astronauts in space landing on a distant planet then exploring for a bit only to come across a glowing vessel with the AC/DC logo on it. In a few moments that vessel is in space making its way to planet earth.... north America, Minnesota... St. Paul.... Xcel Energy Center! In a flash, just as the vessel crashes, out comes the band!

They opened with their latest hit, Rock or Bust which got the crowd roaring even louder than before. At this point, It was all smiles. Mesmerized by the ever-moving Angus Young on guitar and the body contorting, high schrill-of-a-vocalist sounds of Brian Johnson, I was having a blast. To watch these guys at their age (in their 60's) move and play like this was absolutely fascinating. As someone in his 40's at this point in time, I could only imagine what it feels like playing for 2 hours at that age. I bet it takes a few days to recover (no wonder they have a few days off between shows!)

Although the ticket was rather spendy ($160.00 - Club level, Section C22), I truly feel this was probably THE BEST SHOW I have seen in many, many years. The performance these guys put on was absolutely fascinating to watch, they didn't miss a beat when they played and truly proved why they are one of the biggest rock bands in history. I smiled almost all the way through the first handful of songs as I watched my friends rocking-out to each song, hit after hit. If this is the last time I see Brian Johnson and Angus Young, I am 100% content and very happy I saw them one last time.


See below for the set list (taken from Setlist.fm) as well as some photos taken by yours truly as well as some curated by others at the show and captured via Twitter the night of the event.


THE SET LIST
Intro
Rock or Bust
Shoot to Thrill
Hell Ain't a Bad Place to Be
Back in Black
Got Some Rock & Roll Thunder
Dirty Deeds Done Dirt Cheap
Thunderstruck
High Voltage
Rock 'n' Roll Train
Hells Bells
Given the Dog a Bone
Sin City
You Shook Me All Night Long
Shot Down in Flames
Have a Drink on Me
T.N.T.
Whole Lotta Rosie
Let There Be Rock (w/ Angus Young guitar solo)
Encore:
Highway to Hell
For Those About to Rock (We Salute You)


Friday, January 27, 2017

My recently played music tracks!

Here's something not new, but still cool; a somewhat real-time display of what I've been listening to! Powered by Last.fm, I have an audio scrobbler that keeps tracks which 'tracks' I've been listening to. Kinda geeky, I know, but I still think its neat.

"Scrobbling" is a feature which keeps tracks are being played. Like mentioned before, it tracks anything I play on my computer, iPhone or iPad! Not necessarily in real time, but it will eventually get synchronized with my Last.fm account at some point. You've probably noticed that I've written about Last.fm before, utilizing some Wordpress and other website plugins, but these days I am just using it to "track" my tracks played. Now you can still see what I've got spinning on my player at any time by clicking HERE! You can also join Last.fm and become music buddies; so we can each check out what we're both listening to.

NOTE: If you see Justing Bieber and other "pop' tunes on my list of top 10 tracks being played, its not me! (its for my boys and general party-vibe music... ;)

Thursday, January 19, 2017

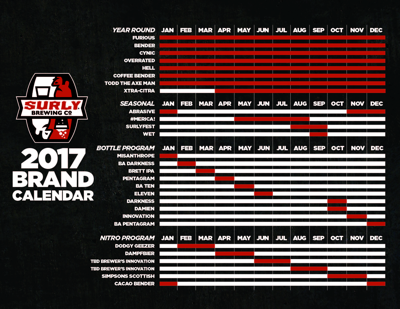
2017 Surly Brewing Co. Release Calendar!

Some of you may or may not know that I am a big fan of the Surly Brewing Co based out of Minnesota. I collect, consume and partake in the beers as well as their Surly Gives A Damn charitable work (yeah, I've done charitable things with them from - rounding up Nice Ride bikes from the U of M campus to spending time cleaning up at the Twin Cities Habitat for Humanity's ReStore location. Aside from doing these great things for the state, they kinda kicked it all off back in 2011 its key, now deemed, "Surly Bill" which has since opened the door for many other great breweries in the great state of Minnesota such as Fulton, Dangerous Man and many, many others. On top of their great beers, I simply love their 'vibe' as well as design that they have!

Even though I am somewhat sad and disappointed in more recent news that co-founder and head brewer, Todd Haug left only to join up with another forceful brewery, Three Floyds based out of Indiana, I am still diggin' what Surly does and will continue to support them. I am eagerly anticipating their releases this year, especially from their bottle program. Click below to check out their 2017 release schedule as mentioned in one of their recent e-mail newsletters:

 Click here to view larger version!


Thursday, January 5, 2017

Humor: Best DUI ever

I know, I know, I know... You've prolly seen this one a few times. It's so goo though, I have to share the love! Not much more I can say about this, but it may have been staged, but its an instant classic!


Wednesday, November 23, 2016

Custom drive icons from OWC (Other World Computing)

I've got a post I have been sitting on for awhile (yeah probably a year! and that's not the only one!) It's a post to 'snazzy up' drive icons on the macOS. For those that may have purchased drives and/or enclosures from the definitive 3rd party vendor for Apple/Mac-oriented devices, Other World Computing, I came across a gem of a find!

If you're ever looking to take advantage of the gorgeous gui that the macOS provides you with, you can actually change the standard, default, built in icons and change them into something even better. For example, i recently was looking to spice up my external miniStack and OMC Express drive icon to something that represented what the drive actually looks like on my computer desktop. Thats when I came across this link from OWC:
http://eshop.macsales.com/Reviews/Framework.cfm?page=/icons/icons.html

Here they have all sorts of icons you can use and they are completely FREE. To use one of these icons on your Mac, simply do this:
  1. On the desktop, right-click the hard drive whose icon you wish to change.
  2. From the pop-up menu, select Get Info.
  3. In the Get Info window that opens, you'll see a thumbnail view of the drive's current icon in the top left-hand corner of the window.
  4. Click the thumbnail icon once to select it.
  5. Press command + v or select 'Paste' from the Edit menu.
  6. The icon you copied to the clipboard earlier will be pasted onto the selected hard drive's icon as its new icon.
  7. Close the Get Info window.
  8. Your hard drive will now be displaying its new icon!
Hope someone finds this 'stash' if icons of use!

Friday, August 8, 2014

Manually add a podcast to your iOS device

As you may know (if you've read some of my previous posts), that I like to listen to books, music and podcasts. Podcasts have been great for catching up on technology news, video games homebrewing, beer reviews and more recently, TV show news/recaps (A Cast of Kings for insight on the HBO series, Game of Thrones) for me for many, many years.

Did you know that you can listen to partial or even complete shows that are air on your favorite radio stations? For years, I have taken advantage of this with shows like Video Games Weekly which is aired on one of the local sports radio stations in town, KFAN. Its been great! With the "power of the podcast", I can listen to my favorite shows on my own time! HOWEVER, as with any technology, things aren't perfect, especially when it comes to the delivery of these podcasts to various electronic devices. I am writing this post in the case you run into a hiccup with one of your favorite podcasts and you simply can't 'subscribe' to it like you normally should say with an iTunes subscription link.

I ran into a situation with a great on-demand show based here in the Twin Cities called The Beer Show which is created by the local AM 1500 ESPN radio station. Well, back in February of this year, my perfectly functioning,automatic download subscription stopped all of a sudden... just for this show. All my other 10+ podcast subscriptions were just fine on my iOS mobile device. Now, I suspect that the tech guru behind the podcast feed at the radio station changed something and thus broke my original working subscription, but I was also unable to subscribe via their website (I believe that is broken as well, at least at the time of this posting).

My fix and alternate way to get this working again was easy:
  1. I first needed to find out the RSS newsfeed link, I was able to get that by clicking on the Feedburner link listed on their On Demand page. From there, I was given the url address to the RSS feed (http://feeds.feedburner.com/1500espn/podcast/beershow) which is what you need. 
  2. Next, on my iOS device, I opened the Podcast app and entered in this same url address and clicked the Search button. 
  3. I was then immediately prompted to see if I wanted to subscribe (which is what I did). The most recent podcast (and some of previous episodes) automatically showed up! BOOM!

I am now back to enjoying about a months' worth of Beer Show podcasts on my iOS device (iPhone)! As a crazed, doped up man once said, "Winning!"

Sunday, March 31, 2013

Book Review: Ready Player One

Its been awhile since I've posted a book review but after *reading* this one, I had to give it some praise out here on the interwebs. Yep, this ones' an audiobook (thus the stress on the *reading* part). I've only listened to handful of audiobooks in my time and I honestly don't know why I don't listen to more. I'm sure as life goes on, I will do plenty more!

Anyway, I've read a bunch of books since my last review posted out here (yes, physically read them). Books such as Abe Lincoln: Vampire Hunter, The Hobbit and the Hunger Games trilogy... but whenever I can, I'll download an audiobook to listen to. Aside from the Micheal J. Fox book I reviewed many years ago, I've listened to some great ones in more recent times but simply never reviewed them on my site. For example, both Daemon and Freedom(TM) written by the tech savvy, Daniel Suarez were excellent to listen to. All these books I've mentioned are great books, but the one I am about to tell you about was SO cool I HAD to post something about it.

The book is a New York Times bestseller titled, Ready Player One written by Earnest Cline. It was released/published in June of 2012 and I first heard about it a few months after that (from one many podcasts I watch/listen to). Anyway, I picked up the audiobook version just about a month ago and loaded it in the ol' iPhone. I'd give it a listened during the commute to work or times where I'm killing time between shuffling one of my two boys around. All-in-all, I want to say it was about a 16 hour long audiobook! Maybe the most sad part is the fact that I listened to all of it in my car.

I won't dive too much into the story too much but before I do, the first really cool thing about the audiobook is that its read by the one and only, Wil Wheaton. Yeah, Gordie from the 80's classic Stand By Me and Wesley Crusher from the 90's show, Star Trek: The Next Generation. Today, in this internet world we live in, Wil Wheaton represents everything that is cool about geekdom (computers, games, beer). Having him read this book makes it that much more cool.

The story is about an impoverished teen living like most people do in his time (which is the year 2044) - spending it online inside a virtual reality world called the Oasis. In this world, people work, go to school, play and do just about everything else there. There is a whole economic ecosystem in that world; money is earned and spent there. In the story, the original developer of this world (James Haliday) had died and as part of his legacy, programmed a 'easter egg' somewhere inside the Oasis. The person who finds 3 different keys followed by 3 gates will uncover this easter egg and unlock the billions of dollars the developer has left in his will. Its basically a super hard scavenger hunt that millions of people have been attempting for over 5 years... without any luck until the main character, Wade (aka Parsifal) uncovers the 1st key.

Of course there is MUCH, much more to the story. You can read more here at Amazon.com's website. The reason I loved this story is because it brought together many of the things I grew up with - all being from the 1980's. All things 80's such as TV sitcoms, vintage Saturday morning cartoons, classic Atari 2600 video games and music from the era. Its simply a brilliantly crafted story! Before I wrap this up, I will give you a little spoiler - near the end of the book during one of the last 'Gates' the characters have to go through, they have to solve a quest which is directly based off the Canadian rock trio, Rush album, titled 2112... The way the author was able to tie this into the story was clever and cool as hell.

Bottom line: if you grew up in the 80's and have any interest in a fictional story involving video games and virtual reality, check this book out!

Friday, February 15, 2013

How to install AirPort Utility 5.6.1 on Mountain Lion for older Airportdevices

UPDATE 11/29/14: I recently had to check on my older AirPort Express but this method I originally blogged about back on 02/15/13 is no longer valid in Yosemite. The good news is that I was able to find another post about it HERE. From this blog entry, the writer has provided a 'wrapper'/launcher application that allows you to open the AirPort Utility 5.6.1 successfully. I have successfully validated this works as of today and thought it would be worthwhile to share. The below post is for historical purposed only.

If you need to access/manage an older Airport devices (in my case the Airport Express), the built-in Airport Utility in Mountain Lion cannot access the device. I know, dumb, huh? Well after scouring the web, I found a solution - you need to install an older version of the Airport Utility (5.6.x specifically). The below steps were originally taken from this Apple discussion thread: https://discussions.apple.com/thread/4172563?tstart=0. I updated/revised it to clarify a few of the steps needed.

1. Download the Airport Utility 5.6.1 disk image at http://support.apple.com/kb/DL1536.

2. Double-click and mount the disk image. Drag the install package (AirPortUtility.pkg) to your desktop.

3. Open up the Terminal application (Go > Utilities > Terminal.app).

4. In the Terminal application, make a temporary directory and cd into it: mkdir tmp ; cd tmp

5. Extract the Payload file from the install package with xar. Here's the command to type into Terminal.app: xar -x -f ~/Desktop/AirPortUtility.pkg Payload. The result will be a directory named AirPortUtility.pkg (just like the file, but now you can move into it to get the files you want). Inside will be a file called Payload that is a compressed archive of AirPort Utility.app.

6. Extract the app. Here's the command: gzcat AirPortUtility.pkg/Payload | tar -xf -

7. When it finishes there will be three new folders Applications, Library, and System. (The copy of AirPort Utility 5.6.1 will be in the Applications >Utilities folder) Type ls to list the directories if your curious to check it out.

8. Use Finder (Go > Go to Folder and type in ~/tmp) to rename Airport Utility to Airport Utility 5.6.1 (assuming you want to keep version 6 as well) then drag it to your Applications > Utilities folder.

9. The final step is to launch AirPort Utility and confirm that it works. You'll probably want to go into preferences and turn off the option to check for updates.

10. If all is good you can remove the temporary directory: cd .. ; rm -rf tmp (or drag it into the trash with Finder).


Hope this helps someone out like it did for me!

Monday, January 21, 2013

DIY: A 'Classic' Sawhorse!

So I was rummaging through some printouts I had when I was cleaning out the garage and came across this - Instructions to build a 'classic' sawhorse. I know, not very exciting but I decided to post this because I did make a set of these many years ago (2005 as a matter of fact) and they are still solid as ever TO. THIS. DAY.

I tried to browse to the url that was listed on the printout however it looks like the source (PopularMechanics.com) decided to re-vamp the design/instructions a bit. HOWEVER, through the magic of the internet, I was able to dig through The Internet Archive: WayBackMachine (Archive.org) and find the article. Click HERE for that original post.

If you're looking for a breakout/detailed diagram of the pieces needed, no need to worry... I scanned in my analog copy and posted it HERE!

Enjoy!

PS: Here is the updated post from PopularMechanics.com as it stands today: http://www.popularmechanics.com/home/how-to-plans/woodworking/4248458?click=main_sr

Here are some other plans (some for free and some for $$): http://www.toolcrib.com/blog/2008/07/24-free-sawhorse-plans-in-the-hunt-for-the-ultimate-sawhorse

Friday, November 2, 2012

VMware Fusion - "No permission to access this virtual machine." error

For those of you that use VMware Fusion on the Mac may run into this issue so I thought I'd post it for others to see. Basically I believe I ran into this issue as a result of running a Macware Disk Tools Pro app on my machine and running the "Defragment Files" feature against my MacOS boot drive. The error I was getting when I tried to launch a VM was generally this: "No permission to access this virtual machine." The reason I believe the defragmentation was the cause was because I remember Disk Tools working on the *.vmwarevm files; it was taking a long time to process.

Anyway, after several google searches, I found a post buried in the VMware community forums where some people were talking about this issue but in the Windows VMware Workstation platform. Figuring I'd give it a shot, I took this info and applied it to the Mac side of things and was able to get it resolved! Here's what I did:

1. Right-clicked on the *.vmwarevm file that is having the issue.

2. Select "Show Package Contents" from the context menu

3. Rename all folders with a ".lck" to ".lckOLD" (or take a risk and delete them)

4. Re-open the file within VMware Fusion.

BINGO! Worked like a champ. It looks like VMware Fusion automatically creates fresh ".lck" folders on it own too. (NOTE: One thing I did do afterwards was go back into the 'package contents' and delete the old *.lckOLD folders.)

That's it! Hope this helps someone down the road!


Thursday, September 22, 2011

H block 10 Reunion Show - September 24, 2011!

It's been many, many years but the boys from H block 10 are re-uniting for a one-time show! In just a few days (Saturday, September 24, 2011) the original lineup, consisting of Adam Coolong, Justin Sirota, James Kinsey and yours truly (Ben Ducklow) are getting back together for show in honor of our good friend, Jeremy Carlsruds' Day of Birth celebration! We'll be playing at The Buck in located in the quaint, quiet college town of Menomonie, WI.

After a special request from Jer a few months ago, he managed to stir up some interest from me and the guys who once rocked various bars, clubs and cornfields in the greater Twin Cities and western Wisconsin area. We've got Adam who happened to have a few days off from his busy Irish acoustic 2-man band, the Wild Colonial Bhoys, Justin (who was able to fly in from Los Angeles, California) and of course, Jimmy and myself (who have been performing as part of the Two Fisted Leroys over the past few years).

We're 1 out of 3 bands performing that evening and are in the middle slot - we should go on about 10pm-ish. We'll be playing alot of the tracks off our 2001 release titled, "The Struggle" such as Dare I, Mistaken, Come Out You Black and Tans as well as some songs written and performed after that release such as Through A Bombsight and Soccer Mom. BRING YOUR EARPLUGS!

So if your looking for a reason to take a road trip or you're in the area, hit me up so we can meet up!